Does your component deliver what it promises?
Classical materials testing is indispensable in the field of failure analysis.
We will be happy to put together an individual offer for you with a wide variety of testing methods. Simply contact us for this.
The following examinations are part of our standard:
Destructive material testing
- Hardness testing according to Brinell, Vickers, Rockwell and Shore D
- Measurement of the Case hardening depth (CHD) and Nitriding hardness depth (NHD)
- Tensile test according to EN ISO 6892-1
- Notched bar impact test according to EN ISO 148-1 (- 196 °C to + 200 °C)
Non-destructive material testing
Especially in non-destructive material testing, we only offer selected methods within the scope of failure analysis. Ultrasonic, magnetic particle or Eddy current testing are not part of our repertoire.
Process descriptions
Brinell according to DIN EN ISO 6506-1
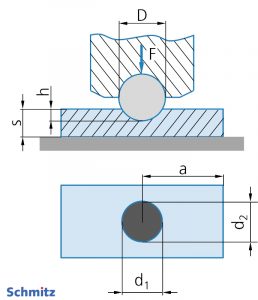
In the Brinell hardness test, a spherical indenter made of hard metal is pressed slowly and shock-free into the test specimen according to the degree of loading. The resulting dome-shaped test indentation is measured after the test force has been removed. The quotient of the test load to the indentation surface is the measure of hardness. The advantage of the method is the representatively large test indentations for determining the hardness of heterogeneous materials such as cast iron.
[Image source: Füllmann, R.: Der Werkstoffprüfer, ISBN 978-3-00-054275-6]
Vickers according to DIN EN ISO 6507-1
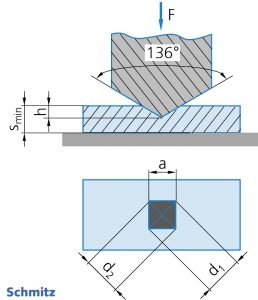
In the Vickers hardness test, a pyramid-shaped indenter with a square base area made of diamond is pressed slowly and without impact into the test specimen. The resulting diamond-shaped test indentation is measured after the test force has been removed. The quotient of the test force to the indentation surface is the measure of hardness. The advantage of this method is that testing can be carried out over the entire hardness range from “soft to extremely hard”.
[Image source: Füllmann, R.: Der Werkstoffprüfer, ISBN 978-3-00-054275-6]
Case Hardening Depth (CHD) according to DIN EN ISO 18203
The case hardening depth after carburizing and hardening is the vertical distance (in mm) from the surface to the depth that has a limiting hardness of 550 HV.
Case study: CHD measurement on sintered gear wheel
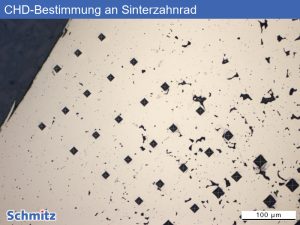
In powder-metallurgical, porous materials, we perform the hardness profile in five rows. Hardness indentations that are too close to pores are sorted out during the post-control, so that the case hardening depth can also be determined properly in this case.
Nitriding Hardness Depth (NHD) according to DIN EN ISO 18203
The nitriding hardness depth is the vertical distance (in mm) from the surface of a nitrided component to the point where the Vickers hardness corresponds to a specified limit. The limit hardness is core hardness (KH) + 50 HV (rounded up to 10 HV).
TIP// Examination of nitriding layers
We are also happy to offer you a metallographic examination of the nitriding layer of your nitrided samples including the determination of the pore content and measurement of the thickness of the compound layer (according to DIN 30902 or AWT/FA5-AK3). Simply contact us for this.
Surface hardening depth (SHD) according to DIN EN ISO 18203
The surface hardening depth is the vertical distance (in mm) from the surface of a surface hardened component to the point where the Vickers hardness meets a specified limit. The hardness limit (GH) is calculated as: A × required minimum surface hardness (HV). A is a factor for which 0.8 is usually used. At a distance of three times the SHD, the hardness should be more than 100 HV below the limit hardness.
Rockwell according to DIN EN ISO 6508-1
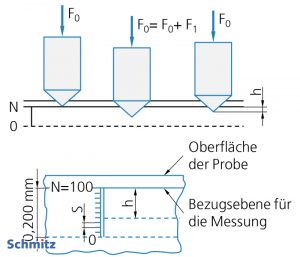
In the Rockwell hardness test, a conical indenter made of diamond or a spherical indenter made of hard metal is pressed slowly and shock-free into the workpiece. After the additional test load is released, the indentation depth is displayed directly on a dial gauge. The advantage of the test method is that it can be carried out quickly and easily.
[Image source: Füllmann, R.: Der Werkstoffprüfer, ISBN 978-3-00-054275-6]
Shore D according to DIN ISO 7619-1
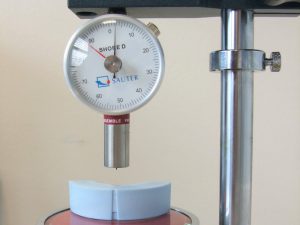
The Shore hardness is used to characterize the hardness of plastics. The best-known variants are Shore A (for soft plastics such as rubber) and Shore D (for hard elastomers). The scale of hardness values ranges in each case from 0 to 100. In the Shore D hardness test, a steel needle with a spherical tip (radius 0.1 mm) and an opening angle of 30° is used as an indenter. This is pressed into the specimen with a contact force of 50 ± 0.5 N; the penetration depth after 15 s serves as a measure of the hardness. A hardness value of 0 corresponds to the maximum penetration depth of 2.5 mm, and a hardness value of 100 to a penetration depth of zero. The thickness of the test specimen should be at least 6 mm. The durometer can also be used in mobile applications.
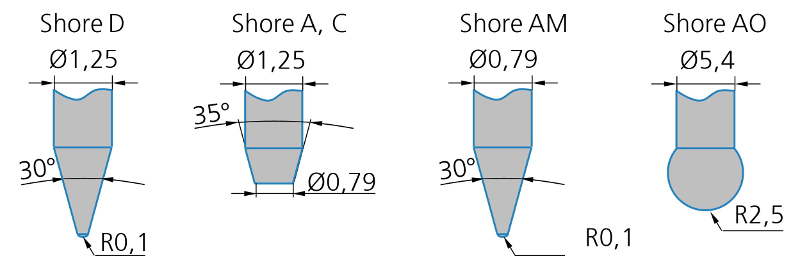
[Image source: Füllmann, R.: Der Werkstoffprüfer, ISBN 978-3-00-054275-6]
Tensile test according to EN ISO 6892-1
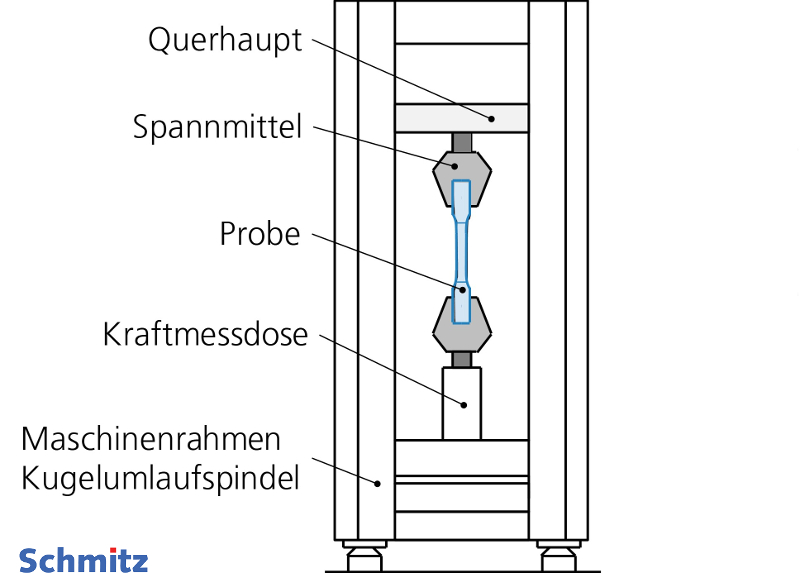
The tensile test is one of the most important tests in materials testing. It is used to determine the mechanical properties under uniaxial tensile loading uniformly distributed over the cross-section. For this purpose, a specimen with a standardized geometry is stretched slowly, uniformly and shock-free until fracture occurs. During this process, the force and extension of the specimen are continuously recorded. The stress is calculated from the quotient of force and initial cross-sectional area, and the elongation of the specimen from the change in length.
[Image source: Füllmann, R.: Der Werkstoffprüfer, ISBN 978-3-00-054275-6]
Notched bar impact test according to EN ISO 148-1
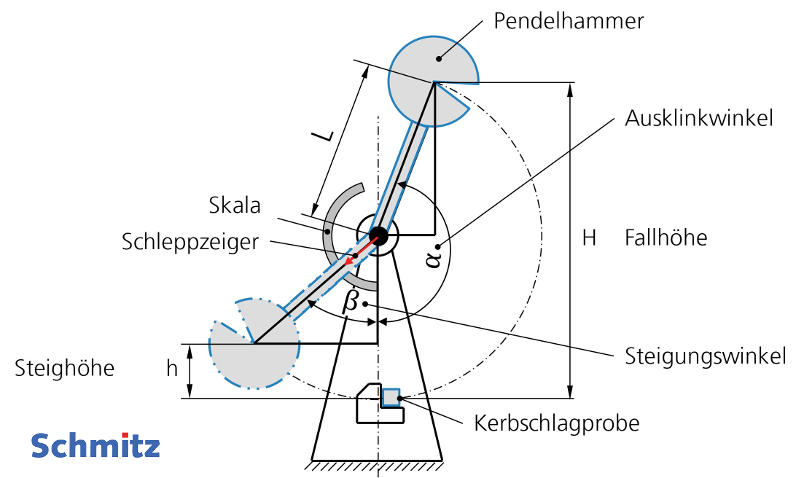
The notched bar impact test (Charpy impact test) is used to determine the toughness of a material under impact stress. For this purpose, a centrally notched square specimen is fractured with a pendulum impact testing machine. The impact energy consumed is the measure of the toughness of the material.
[Image source: Füllmann, R.: Der Werkstoffprüfer, ISBN 978-3-00-054275-6]
Penetrant testing according to DIN EN 571-1
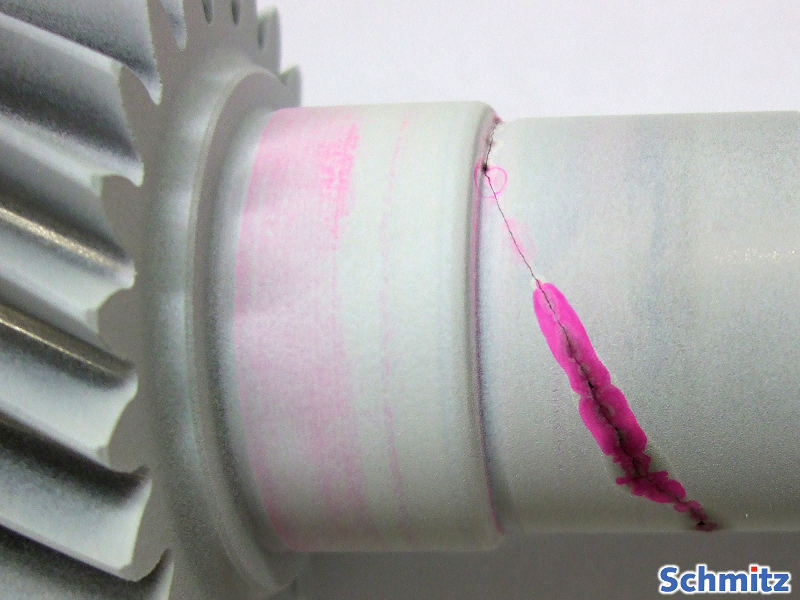
This is a non-destructive surface testing method for cracks and pores. We use this method to define separation cuts in order to open incipient cracks. The fracture surfaces are then characterized in the SEM. The high-contrast penetrant penetrates surface defects by capillary action. After cleaning again, a contrast agent is applied, which draws the penetrant paint out of the fine cavities, thus making defects visible.
Grinding burn test / Etch inspection (according to AMS2649, type I and II)
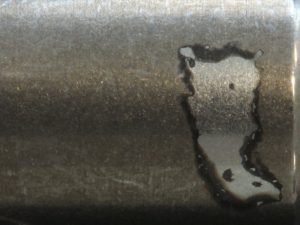
The grinding burn test is used to detect locally overheated zones on martensitic steel surfaces. Overheating occurs, for example, during grinding machining or welding of the specimens and can lead to rehardening and/or softening of the stressed areas. In the grinding burn test, the cleaned specimens are etched in HNO3, followed by visual inspection and documentation.
Since the test causes very little material removal of less than 1.5 µm, it is assigned to the non-destructive methods. In this way, not only random samples but entire batches can be tested.
